Deploying a voice assistant in every room of your home becomes surprisingly affordable with the M5Stack ATOM ECHO. This feature-dense small cube allows you to control Home Assistant via voice without investing in expensive or intrusive equipment.
Why the M5Stack ATOM ECHO?
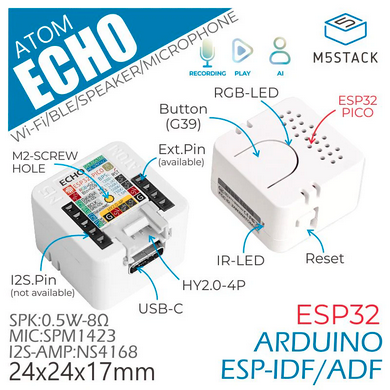
The ATOM ECHO stands out due to its ultra-compact form factor (24x24x17mm), integrating everything needed for audio: a microphone and a speaker. Powered by an ESP32-PICO-D4 SoC, it provides the essential Wi-Fi and Bluetooth connectivity for smart home integration.
- STT Support: Ready for Speech-to-Text services.
- Expandability: A Grove port allows for the addition of environmental sensors.
- Visual Feedback: An integrated RGB LED indicates the assistant's status.
- Cost-Effective: Its price point makes multi-room deployment accessible.
Hardware Overview & Pinout Warnings
Under its plastic shell, the ATOM ECHO houses an SPM1423 PDM microphone and an NS4168 I2S amplifier. However, its compact design imposes strict restrictions on pin usage.
Critical Wiring Warning
Important Warning: Never reuse pins G19, G22, G23, and G33. These are predefined for the internal audio circuit. Any attempt to use them for other components may permanently damage the device.
Audio Precautions
Audio output is limited (0.5W to 0.8W). To avoid damaging the speaker, avoid sending DC signals, intense white noise, or full-scale square waves.
Getting Started: From Box to Connected Device
Setup begins by connecting the device via its USB-C port. While it ships with factory firmware, reflashing is required for Home Assistant integration.
- Connect the ATOM ECHO to your computer.
- Use the M5Burner tool or the ESPHome Web installer to flash the firmware.
- Configure your Wi-Fi credentials during the installation process.
- Verify that the RGB LED lights up, confirming the device is connected to the network.
Integrating with ESPHome and Home Assistant
Once flashed, the device must be "adopted" into your ESPHome instance to allow for custom configuration.
ESPHome Configuration
Create a new node in ESPHome and use a configuration tailored for voice assistants. Here is a minimal example for the audio component definition:
voice_assistant:
  microphone:
    i2s_audio: audio_in
  speaker:
    i2s_audio: audio_out
Connecting to Home Assistant
After the code is compiled and uploaded, Home Assistant will detect the device. Link it to your voice pipeline (Assist) to configure wake words and home automation commands. Using the community guide for $13 voice assistants is highly recommended as a configuration baseline.
Practical Use Cases & Extensions
The ATOM ECHO is more than just a Q&A; tool. You can use it for:
- Automation: Control lights or thermostats via local voice commands.
- Streaming: Use A2DP support to stream audio via Bluetooth.
- Sensing: Connect a temperature sensor via the Grove port to create a vocal terminal reporting the room's climate.
Troubleshooting & Known Issues
If you encounter Wi-Fi connection problems, ensure your 2.4GHz signal is stable. In case of audio distortion, check that the software volume is not clipping.
Version Note: This guide applies to the original ATOM ECHO (ESP32-PICO-D4). If you have the ATOM Echo S3 variant, note that it uses an ESP32-S3 processor, which requires different pin configurations and firmware.
What's Next?
Now that your voice assistant is operational, explore creating complex scripts in Home Assistant to automate your morning routines, or discover how to add air quality sensors via the Grove port.
